|

| PAINT |
|
Fresh
paint
- It's highly recommended that you
follow these precautions in the first few months of your Healey's new paint
finish.
In
the first 90 days:
- Do not wax or polish your Healey.
This will allow the finish to dry and harden completely. Never use wax or
polish containing silicone.
In the first 30
days:
- Do not use a commercial car wash or
stiff brushes and sponges. This could mar and damage the finish. Always use a
soft cloth or sponge.
- Never wash your Healey in the sun.
Instead wash it in a shaded area.
- Do not dry wipe your Healey. Dry
wiping could scratch the finish.
- Extreme heat and cold are to be
avoided.
- Do not drive on gravel roads.
Chipping the finish is easily done in the first 30 days.
- Don't park under trees which drop sap
or near factories with heavy smoke. This can mar and spot your paint
finish.
- Bird droppings have a high
acid contented and will damage a freshly painted surface. Wash it off as soon
as possible.
- Don't spill gasoline, oil,
antifreeze, tranny fluid, or windshield solvent on the new finish. If you do,
immediately rinse it off with water.
|
Cured paint finish
- Once the paint finish on your Healey
has had an adequate time for drying and hardening, its time for a quality wax
job.
- On a baked finish wait up to 90 days.
On air dry finishes wait up to 6 months to a year making sure all the solvents
have come out.
- When it comes to waxes, we recommend
Mothers High Performance Car Care Products. Mothers California Gold Original or
Natural Formula Carnauba Cleaner Wax is designed to be the one step plan for
paint preservation.
|
Renewing your paint finish
- As your paint finish gets aged and
the ultra violet rays of the sun dry out the solvents, your paint may lose some
of its crisp reflection and depth. As the solvents are drying out of the paint
the mirror finish gets a grainy look, which distorts the reflection. Here's how
to remedy this problem.
- Make sure there was enough mills of
color or clear applied. In other words, make sure there was at least 3 good
coats of color or clear applied to your Healey.
- Wash your Healey and make sure there
is no dirt or grit of any kind on the paint finish.
- You
will need a bucket of clean water and several pieces of a 1500 grit or 2000
grit micro fine water sanding paper. Use clean rags, sponges, squeegees, a
machine buffer with a foam pad and a medium and fine rubbing compound.
- Dip the rag in the clean water and
apply the water to the paint finish. Then start sanding. Always sand
horizontally never vertically. Overlap each stroke applying light pressure and
making sure no dirt or grit gets underneath the sand paper. Use no more then 3
or 4 strokes in the same area.
- When you get a panel sanded, squeegee
it off. This will allow it to dry quickly. You should end up with a dull
finish. The shinny spots will need a little bit more sanding. Then dry it off
again and move to the next panel.
- Continue until you have your Healey
micro fine sanded. Then its time to machine buff your paint. Using the medium
rubbing compound, buff a 1 foot by 1 foot area at a time.
- You my have to buff it several times
to remove the micro fine scratches. Then hand rub it with the fine compound to
remove the buffing swirl marks. Eventually, a crisp refection will
appear.
- Wash your Healey making sure you
remove all the compound that is in the cracks and crevices. Then shammy the
paint finish dry and apply your topcoat wax or polish.
- Helpful Hint - Buffing is a messy job
make sure you plastic your rag top and mask off any rubber items. This job
usually take a professional between 10 to 30 hours depending on condition of
the paint service.
|
Paint problems
(Here are just a few problems that may occur if you are painting
your Healey.)
- BLEEDING - Color
seeping through the new top coat color.
- BLISTERING - Bubbles
appearing in the top coat film often months after you painted your
Healey.
- BLUSHING - A milky white haze that
appears due to humid weather conditions.
- CHALKING - Pigment no
longer held by binder, which makes the finish look dull.
- CHEMICAL STAINING - Spotty
discoloration on the painted surface usually due to atmospheric industrial
contamination.
- CRACKING - Deep cracks resembling
three legged stars mostly because too much color or clear is
applied.
- CRAZING - Fine splits or small
cracks, also called crows feet, due to cold shop conditions.
- FISH EYES - Crater like openings in
the finish after it has been applied. It's usually caused by improper surface
cleaning and/or waxes and silicones.
- LIFTING - Surface shriveling while
the top coat is being applied or while drying.
- MOTTLING - Occurs in metallic's when the flakes float together to
form a spotty appearance. It's caused by spraying too wet of coats or holding
the spray gun to close.
- ORANGE PEEL - Uneven surface
formation, improper spray gun adjustment, extreme shop temps or not mixed
correctly.
- PEELING - Loss of adhesion between
paint and primer or primer and metal. It's due to improper preparation or
improper metal treatment.
- PIN HOLING - Groups of tiny holes in
the paint finish usually caused by moisture left on the primed surface or
contamination in the air line.
- RUNS AND SAGS - Too heavy of sprayed
material.
- SAND SCRATCH SWELLING - Too coarse of
sand paper used or improper thinner or reducers used.
- SOLVENT POPPING - Blisters on the
painted surface caused by trapped solvents.
|
Color matching original Austin Healey colors
- Most of the colors that were applied
to the Healey's are easily matched with the exception of 3 colors.
- Two of them are Healey Blue Metallic
and Golden Beige Metallic. The color can be matched, but the metallic flake in
them are different. In the 50's-60's, paint manufactures used a fine metallic
flake and in 70's-90's, they used a larger metallic flake, which would make the
paint sparkle even more. By putting the paint on wetter, using lower air
pressure, and a slow drying reducer you can bury the flake and make the
metallic flakes lay flatter, so the appearance is not so sparkly. But you have
to be very careful, because this can cause a bad case of MOTTLING.
- The other color is Primrose Yellow.
As the yellow drys out, it has a more of a yellow-green appearance. Additional
tinting to the color may be required.
|
Color
matching 2-stage Austin Healey colors
- With today's advancements in
technology, color matching is made easier with the assistance of a P.P.G.
Prohet Multi-Angel Spectrophotometer Camera. It is designed for measuring the
color on paint finishes. The instrument incorporates a signal light source and
three fixed aspecular viewing angels (flash, face, flop) using an
electro-mechanical shutter system to sequentially view the different angels.
Wavelength discrimination is accomplished with an array of interference filters
and software, which is linked to a color database. This has ten to hundreds of
thousands of colors for you to choose from, coming up with the closest mixing
formula for that particular color.
- NOTE: I'm not saying it is a 100%
color match, but in my experience, I would say it has a 9 out of 10 accuracy
for a blendible match. Yes, there is that occurrence that a test panel has to
be made and additional tinting with pigments are required.
|
| Undercoating your Austin Healey
- That's a NO! NO! Undercoating may
deprecate your investment. Buyers may think that undercoating is hiding the
imperfections of poor workmanship. Plus, your Healey was not undercoated when
it was built.
- On the other hand, restorations are
not cheap and Healey's do have rust prone areas. Here's what you can have done
to protect your investment . You can have the inside of the framerails, sill
panels, outriggers and rocker panels fog misted with a clear undercoating using
an undercoating gun and wand attachment. This will put your mind at ease and at
the same time preserve your Healey.
|
Protecting the top of yout painted windshield
posts
Windshield posts for a
100-4, 100-6, 3000
- These windshield posts are supposed
to be painted, but when you put the top on it sometimes can chip the paint on
the top part of the posts. Especially, when you are in a hurry because the rain
is bouncing off your head. Here is a simple remedy you can do to protect the
paint.
- They make a 1/32 thick clear plastic
stone guard tape found at your local GM or FORD Dealership Parts Department.
They use this product on some of their cars and trucks to prevent chipping in
high prone areas. Trim a 1 inch x 2 inch piece and place it at the top of the
post 1 inch down from the top of the post. Then trim it out with a razor blade.
Because the tape is clear, the color will show through.
|
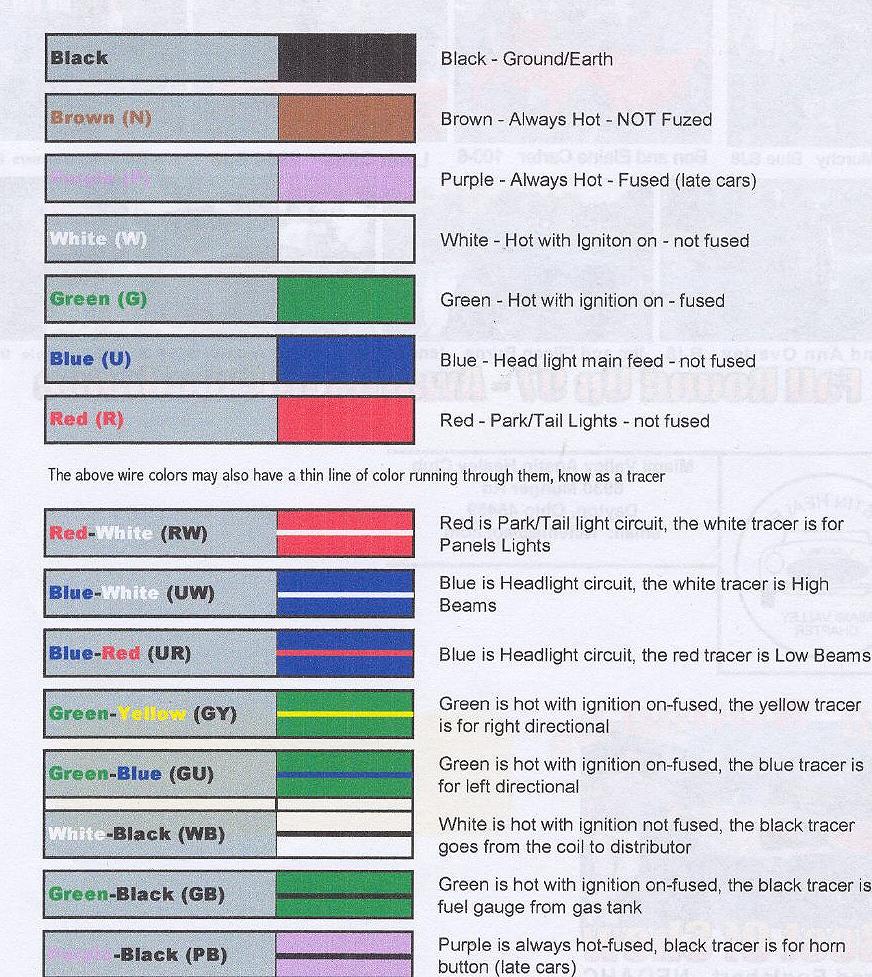
| WIRING |
Austin Healey wiring
- Here's a quick reference guide for
most Healeys. The plain solid colors like red, white, brown, black, purple,
green and blue tell you which circuit they belong to.
Click on
the picture to enlarge!
|
back |